Difference between revisions of "ProxCP Billing - Blesta"
From ProxCP Documentation
| Line 39: | Line 39: | ||
** Proxmox Node: which Proxmox node should new services be created on for this product? | ** Proxmox Node: which Proxmox node should new services be created on for this product? | ||
** Default OS Installation Type: should new orders be created with ISO mounts or from template clones? (KVM ONLY) | ** Default OS Installation Type: should new orders be created with ISO mounts or from template clones? (KVM ONLY) | ||
| − | ** Other module settings should be self-explanatory for service resources (storage, CPU, RAM, bandwidth) | + | ** Other module settings should be self-explanatory for service resources (storage, CPU, RAM, bandwidth) [[File:ProxCP Blesta Package.png|frame|right]] |
| − | [[File:ProxCP Blesta Package.png|frame| | ||
* This covers the Blesta provisioning module for ProxCP. The module supports all automation functions creation, termination, suspension, and unsuspension. | * This covers the Blesta provisioning module for ProxCP. The module supports all automation functions creation, termination, suspension, and unsuspension. | ||
Revision as of 14:46, 8 May 2019
ProxCP Blesta Requirements
- Blesta version 3.1 or higher
- ProxCP uses its built-in IP manager to assign IP addresses to new services from Blesta. First, login to your ProxCP admin account and go to ADMIN > Manage IPv4 Pool. Add an IPv4 pool as requested on the page for Blesta to use.
- The ProxCP Blesta module communicates with the ProxCP API to manage services. To create API authentication credentials, go to ADMIN > Manage API and create a new API ID/Key pair. In the IP restriction box, enter the IP address of your Blesta installation location. IP restrictions are required for the API.
ProxCP Blesta Installation
- Upload all files in the _blesta_module directory to the components/modules/ directory of Blesta
...That's it!
ProxCP Blesta Configuration
- In Blesta, go to Settings > Modules > Available
- Find ProxCP and click the Install button
- In Blesta, go to Settings > Modules > Installed
- Find ProxCP and click the Manage button
- Click the Add Server button in the top right
- Give the ProxCP server a label; it can be anything
- Enter the domain/hostname of your ProxCP installation location (i.e. proxcp.domain.com). Do not include port numbers or http(s):// protocols
- Enter the API ID and API Key provided to you in the ProxCP ADMIN area (ADMIN > Manage API)
- Click the Add Server button
- Note: you only need 1 ProxCP server for all Proxmox nodes
- ProxCP requires two configurable options for Blesta packages
- In Blesta, go to Packages > Configurable Options and create a new group
- Once the group is created, create two new configurable options and assign them to the new group
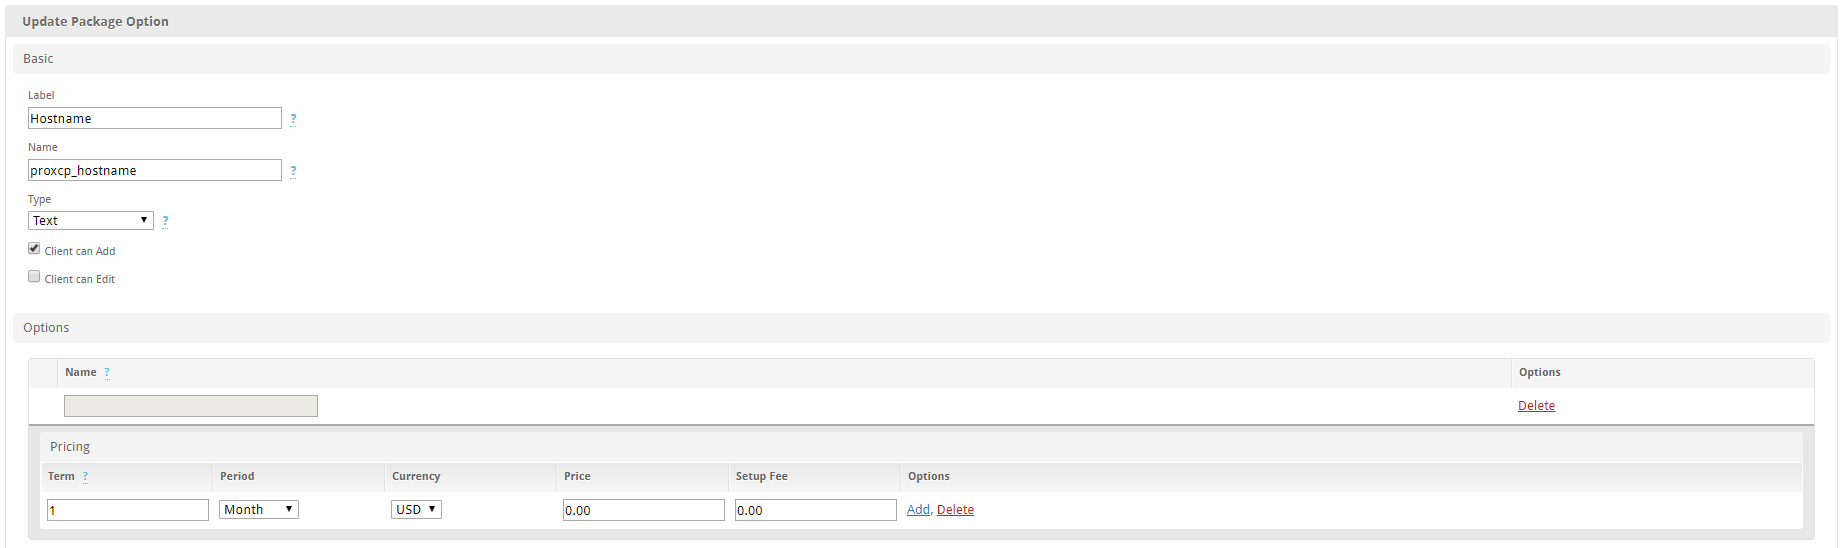
- Option 1: Hostname (proxcp_hostname)
- Option 2: Operating System (proxcp_os)

- Option 1: Hostname (proxcp_hostname)
- The Name field for each of these options needs to match the screenshots


- In Blesta, go to Packages > Browse Packages and create a new package
- Ensure the new package is using the configurable option group you created earlier with the Hostname and Operating System options
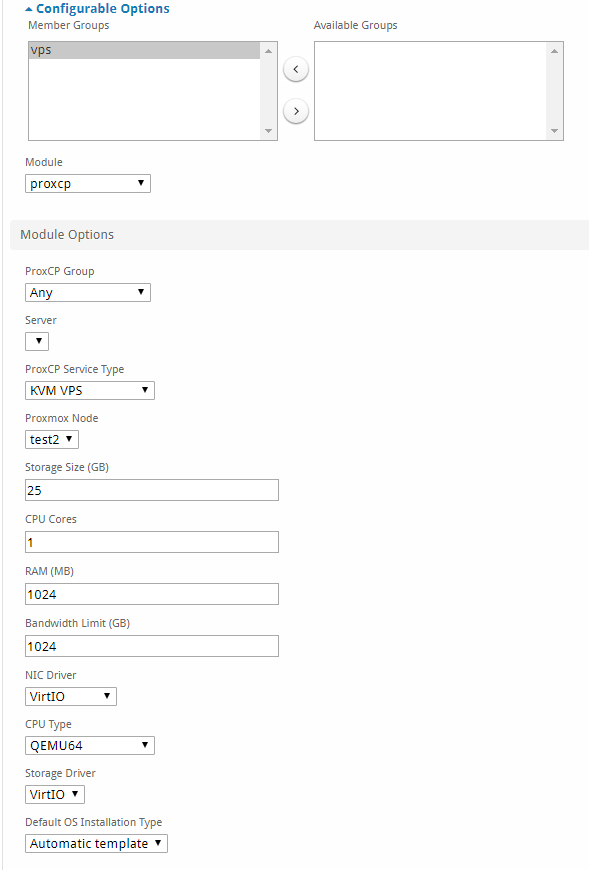
- Select proxcp as the module
- Select any as the ProxCP Group
- The Server dropdown can be left blank/default
- ProxCP Service Type: KVM, LXC, or KVM Public Cloud
- Proxmox Node: which Proxmox node should new services be created on for this product?
- Default OS Installation Type: should new orders be created with ISO mounts or from template clones? (KVM ONLY)
- Other module settings should be self-explanatory for service resources (storage, CPU, RAM, bandwidth)

- This covers the Blesta provisioning module for ProxCP. The module supports all automation functions creation, termination, suspension, and unsuspension.