Proxmox Configuration
From ProxCP Documentation
Contents
Required Proxmox Configuration
ProxCP requires Proxmox VE 5.3 or above
- Ensure BIOS options are enabled to support KVM/QEMU/hardware virtualization
- The public network bridge is assumed to be named "vmbr0" (Proxmox default)
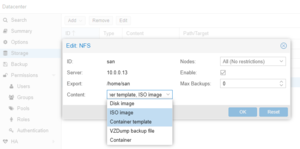
- If you have more than 1 Proxmox node, it is expected that you have a shared storage location for LXC templates and KVM ISO files (such as NFS)
- ProxCP assumes that all LXC templates and KVM ISO files are available on all Proxmox nodes
- If you want to enable VPS backups in ProxCP, ensure the "Max Backups" setting for the storage location in Proxmox is set correctly
- If you want to enable per-VPS firewall management in ProxCP, ensure the "Firewall" option is enabled in Proxmox under Datacenter > Firewall > Options tab
- Global input policy and output policy should be ACCEPT
- For ProxCP noVNC support, you must upload the vncconsole.html file we provide to every Proxmox node in the /usr/share/novnc-pve/ directory. The vncconsole.html file is located in the ProxCP Web files (_upload_proxmox_novnc folder).
- A validated SSL certificate is required; a self-signed certificate will not work. See: https://pve.proxmox.com/wiki/Certificate_Management
Recommended Proxmox Configuration
- ProxCP requires Proxmox login credentials to be saved. It is highly recommended to create a new user and to not use the root user.
- This new user should use the "Proxmox VE authentication server" (pve) realm
- Once created, your new pve user should have the Administrator role on / path (v1.7: PVEAdmin is no longer enough)
- If you have multiple Proxmox nodes and have backups enabled in ProxCP...
- Proxmox VMIDs need to be unique across your infrastructure. One way to do this is to assign VMID ranges to each Proxmox node by creating a small, fake VPS with the beginning of the VMID range.
- Example: you have 3 Proxmox nodes (node1, node2, node3)
- You assign a VMID range to each node as follows: node1 1000 - 2999, node2 3000 - 4999, node3 5000 - 6999
- To enforce these ranges in Proxmox, node1 would have a small, fake VPS with VMID 1000, node2 would have the same thing with VMID 3000, and node3 would have the same thing with VMID 5000
- This works because ProxCP determines the next VMID by incrementing the largest present VMID by 1
- Proxmox accepts VMIDs in the range of 100 - 999,999,999
- This is required because Proxmox backups are saved and named according to VMID only and it is currently not possible to change backup file names
- Proxmox VMIDs need to be unique across your infrastructure. One way to do this is to assign VMID ranges to each Proxmox node by creating a small, fake VPS with the beginning of the VMID range.
Proxmox Configuration for Private Networking
- This is largely up to you however ProxCP assumes the private networking bridge in Proxmox is named "vmbr1"
Proxmox Configuration for NAT Networking
- ProxCP creates a new "vmbr10" bridge when a node is NAT-enabled. You do not need to make any manual configuration changes. When you create a ProxCP NAT node, our software takes care of all the networking setup.
